Saturday, March 17, 2012

hello gorgeous!

today, I wanted to share with you some of my favorite current beauty buys. although I wish I had a new craft every blog post, sometimes I sadly just don't have time to craft! so, instead I will be posting little gems like this :) my current obsessions in the beauty world are:


  • Bath & Body Works Pink Chiffon body wash
  • Bath & Body Works C.O. Bigelow Vanillamint Mentha lip balm
  • Benefit so hooked on Carmella eau de toillette
  • Benefit Dr. Feelgood mattifying balm
  • Benefit Watt's Up highlighter
  • Essie Merino Cool polish
  • Paul Mitchell sculpting spray
  • Urban Decay Naked Palette

this stuff is what I would imagine heaven to smell like. you could of just sold me on the packaging (the font!?) but the smell is to die for as well. it smells like candy to me, and it's perfect for spring time. it works into a foamy lather in the shower and you feel fresh and clean all day!

THIS. is my favorite lip balm of all time. it smells amazing, makes your lips super soft for a long long time, and is also edible! the mint freshens your breath and the vanilla makes it taste a little sweet.

oh, just my new favorite fragrance of all time. this perfume is sensual and a little different. it smells kind of like caramel and vanilla, but with a twist. and again, the packaging is adorable. the bottle looks like a little martini shaker! all of the crescent row fragrances come in those cute boxes too, which are even more adorable inside, they each match the scent "personality" i guess you could say!

okay, I know it sounds weird. a balm for my face? I thought I would break out for sure, but this product had such good reviews I just had to try it. now, I call it my Dr. Miracle worker! seriously. I have oily skin around my t-zone, and I've never had any luck with makeup that promises a matte complexion all day. but this one does the trick! I put it on underneath my foundation, and I swear my skin stays shine-free for the rest of the day. the smell is slightly minty, but I enjoy it!

so by now you can probably tell I'm a sucker for Benefit cosmetics. this is my favorite highlighter! I put it on my cheekbones and browbones, and it gives a nice light shimmer, and even a little sun kissed-ness (?). not too sparkly (like some highlighters) and a cream to powder finish makes this product a keeper. it doesn't hurt that the packaging is adorable, again, and it even looks kind of like a light bulb! (as shown in the first picture, far right). the bottom part is a small sponge for blending, so you don't need to use your finger. bravo, Benefit!

I've always been a huge fan of Essie's nail polish colors. they're so different and the cute little bottle seems to be just the right amount. this color caught my eye because it has a kind-of grey kind-of purple feel to it, and seeing as those are my two favorite colors I had to try it out! it mostly looks grey on my nails, but there's a slight purple tint. personally, I love it! it looks great on toes if you're afraid of a dark color on your fingers. two coats and a clear coat and you're good to go!


I honestly want to eat this every time I use it. It smells like a watermelon candy! I know that sounds weird for your hair, but trust me... you'll love. it holds my paper-thin hair in place when I curl or straighten it, and its more flexible than your typical hair spray. it doesn't hurt that the scent doubles as a sort of perfume for your hair... :)


this is my go-to palette for any eyeshadow need. it is all neutral colors (the blue in the picture actually looks black/grey on), and it's perfect because you can mix different shadows, according to what color you want. they all work well together so it makes it easy to do highlights and contours (you can tell i'm no beauty expert, haha). you can go from a casual look to a dark, night-time look so easily. the case it comes in is very slim and portable also, not to mention pretty! this product has 5 star reviews on sephora.com.. I think that speaks for itself! the primer (little purple tube on the left) works wonders too! it keeps shadows in place all day.

there is also a Naked 2 palette out, which looks just as good! it seems a little steep at $50, but actually each shadow in the palette has just as much product as ONE urban decay shadow, and the individuals are $17 a piece!


well, I hope you all enjoyed my current beauty faves. What are some of your favorite beauty products right now? I'd love to hear!


all my love,
Greta

Thursday, March 8, 2012

oh happy day!

hey my little crafters :)

as promised, I've been crafting out the wazoo over spring break. I think i've done a minimum of two crafts a day, haha. the other night, my friends and I had a craft night, complete with skinnygirl margaritas - YUM. so, let's begin with some of cute and easy crafts I made that night.

  • swizzle sticks!
supplies: wooden dowels, hot glue gun, sand paper, sparkly poof balls (?)

begin with cutting your 12 inch wooden dowels in half. mine were 1/8 inch in diameter, which seemed to be the perfect size for drink mixers!

after you have cut them, simply sand off the edges, especially where the cut was made. as you can see below, there were definitely some splinters on the ends, and no one wants that in their drink! I even sanded the rest of the rod, just incase there were some other splintery sections.

next, simply put a dab of hot glue onto the poof balls, and stick the wooden rod into the balls, hold for approximately 10 seconds.


and you're done! how cute?!
personally, I think they're so cute and simple, they add a little flair to any cocktail! I only made silver, gold and red, but the green and gold combo could be good for a St. Patty's day party!


  • glitter mason jars
supplies: mason jars (any size), mod-podge, glitter, painters tape, foam paint brush


another SUPER easy project, and it involves glitter; what could be better! so, I chose two different sized mason jars for this project. one 32 oz and one 16 oz (only $1 each!) I began by sectioning off which part of the jar I wanted to be glittered. a little bit more than halfway up the jar seemed to look best, but everything is personal preference! it's easy to tape off also because of the measuring lines on the sides of the jars.


next, take a foam paint brush and spread the mod-podge on the lower part of the jar. make sure to not gather too much at the bottom, or else when the jar sits, the glitter will make it wobbly!


sprinkle on your fave color glitter, and let sit for a few hours to ensure that the glue has completely dried. the finished product?

the cutest mason jars ever! I think I'm going to put little tea lights in mine, but you could even put makeup brushes or pencils in them!


  • the canvas quote
supplies: canvas board, fabric, elmers glue, glitter, hot glue gun, martha stewart pom-pom sticker

oh happy day! my favorite craft of all time (i think). first, take a blank painters canvas, and cover it in fabric. I had two different types of fabric that i bought that night, and had SUCH a hard time deciding which one to use. i got them 40% off at Jo-Ann fabrics with a coupon! (i secretly wish I was an extreme couponer) but this was a pretty good steal at only $6 a yard. so, here were my options.

I was trying to decide which would look better with the gold glitter lettering i was going to use, and ultimately decided on the pink! the sea-foam green fabric i'll use for something else. so, I began covering the canvas with the fabric, and hot-glue gunning it to the back. make sure you pull it taut!


in the corners you can do a little fold over, and put a bit more hot glue.


and there you have your fabric-covered canvas!

remember in like 3rd grade when you would make letters from elmer's glue and glitter? well, that's exactly what you can do on this project! and, it's easy because if you mess up, you can simply wipe off the glue and start all over. so, I chose the quote "oh happy day" because it's bright and I think it'd be something cute to look at every day. I apologize for the lack of pictures for this next step, but I'm sure the third-grader in you can get the jist of it! :) don't forget to funnel the extra glitter back into the jar once you're done!

HOW. CUTE.?!?!?!


this is going to go where I look at it first thing when I wake up everyday. it just makes me happy! oh, and that little poof ball in the exclamation point is one of these little gems:

Martha Stewart craft stickers! It was my splurge for the project at $5.

Well, I hope you enjoyed my latest crafts, and hopefully you are compelled to try them also :) there are more to come over spring break!

all my love,
Greta

Saturday, March 3, 2012

all is fair in love and crafts

hey pretties!

so FINALLY I'm on spring break-weeeeee! and that means more time to craft and more blog posts! today, I was just kind of bumming around my dad's house when I decided to re-organize my room. I have this adorable antique bedside table, but the inside of it was so blah. I was thinking of moving all my makeup to the top drawer, but I wanted to spice it up a little. hence, the mod-podge drawer.

supplies: piece of furniture that needs a little more pizzaz, mod-podge, paint brush, scrapbook paper, scissors, ruler.

(get this.. the cost of the whole project was about $4. 50 cents per piece of paper, about $3 for a small container of mod-podge, and the rest i already had!)

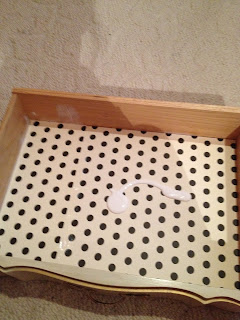
first, I chose this adorable polka-dot paper, and measured it to the correct size of the drawer. i used about 1 and a half pieces. the dots don't match up perfect.. but nothing is really perfect in crafting.


next, I simply painted on a pretty thick coat of mod-podge on the wood part of the bottom of the drawer. I placed the bigger piece of paper (shown above) on first, then placed the smaller paper on the left side (so they over-lapped a little). once the paper was secured, I basically went to town with the mod-podge!


the mod-podge acts like a seal or a clear coat for the paper, so when I put things in the drawer the paper won't get all scratched up! Once you're done with the top coat of mod-podge, you just have to wait for it to dry! And there you have your newly-refurbished drawer :) I kid you not when I say this project took me less than 10 minutes... so worth it!


here it is "in action"... haha


it's safe to say I'm obsessed. it looks so girly and chic! plus, it adds a little element of surprise everytime someone opens the drawer. love love love.

let this be a lesson to everyone, ANYTHING can be made new with a little imagination. like i said, all is fair in love and crafts!


all my love,
Greta