1. the "everything" table
I call this the everything table because everything just happens to accumulate on it, since I placed it right next to the door as you walk in.
supplies: old table, semi-gloss paint, paintbrush, sandpaper
so, I began with this ratty old table that was just collecting dust. I sanded it, so to take what was left of the gloss varnish off.


ahhh, good as new! here it is in action...

2. the antique table
supplies: old table (again), semi-gloss paint, matte paint, valspar "weathered crackle" glaze, clear spray protectant, sand paper, paint brush
for awhile I had been having this issue with what I wanted for a kitchen table. with a limited budget, I wasn't ready to drop $300 on a new ikea kitchen table (although Ikea is my fave). and I just didn't like the cheapy table and chairs sets at Walmart. so, I decided to just re-purpose an old table and splurge on some pretty chairs to compliment it.
this was my shabby-chic inspiration!

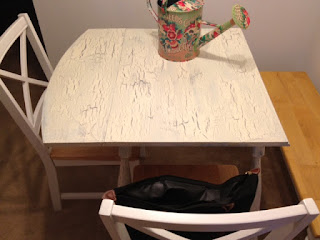
here is the table i began with. it leaves MUCH to be desired, I know. (so does my grungy garage as the background here...)


I won't lie, I ALMOST stopped here, just because I love grey so much. after that coat has dried (I did two coats) paint over entire table with the valspar weathered crackle glaze. you have to wait for that to dry for about one hour, and then quickly paint over it with a matte coat of a different paint color.


and almost immediately you start to see the crackle! it's almost like crackle nail polish. after that step has dried, you simply spray it with clear protectant and let dry (at least 24 hours). I was kind of skeptical that it looked TOO shabby-chic, but now I love it and all my guests seem to also :) here it is compared to the paint chip I had picked out...

here it is with my two new chairs!

I'm a huge fan, mainly because I loveeee shabby chic anything. and it's fun to say that I painted it when my guests ask!
3. the fork hooks
supplies: 4 forks, shelf, paint, paintbrush, 4 screws, screwdriver, pliers, metal bender(?), spray paint (optional), clear gloss spray paint

so awhile ago I had spotted the cutest fork hooks on etsy.com, however, they were around $45 and I decided that it would be way more fun & cheaper to make them myself! First, I chose four different forks that I had around the house (our dinner sets are now all missing one fork... oops! sorry dad). I had a friend help me bend the forks into the "rock on," "pinky up," "f you," and "peace" signs, to make them look like hands. My friend also bent the bottoms of each, so to make them into hooks. This part was kind of complicated, but you just need to find yourself a Dad or guy friend with tools who is willing to help ya :)
here's a close up of the forks, pre-spray paint. I liked them without the paint also!

next, I bought a shelf from Pat Catan's for around $7 to mount them on. I had to add a little piece of wood under the shelf part, so that the forks could be screwed in. My dad helped me with that part (group effort, people!) The shelf prior to painting..


after letting the paint dry on the shelf, I drilled holes into each fork, and screwed them into the shelf (make sure to use screws that aren't too long, so they don't poke through!) the final product?!? pretty much my favorite craft to date...


don't worry everyone, now that it's summer there will be plenty more craft days with my biffs which equals more blog posts! stay tuned :)
all my love,
Greta
No comments:
Post a Comment